Make the small things matter and your life will be much nicer. We all have "not such great days" sometimes. So even if seeing a rainbow is the only nice thing that happened today, make it matter. Let the rainbow (or any other minor, seemingly unimportant event) turn your whole day into a "good day" :)

Showing posts with label diy. Show all posts
Showing posts with label diy. Show all posts
Just a rainbow day {free printable}


Spring up your home by upcycling
It's the beginning of March and all I see around are willow catkins. Flower shops are full of them and even grocery stores have put buckets full of them near the check out counters. Usually they sell a bundle of six thick birches that are about one meter long and full of catkins for 3€ (4$). Since I wanted only few short thin birches, I cut them off from the willow in the inner courtyard of our building, Then I just took an old olive glass jar and a colored straw ribbon with a flower wire and our new spring home decoration was done :)

Materials
- four thin willow birches
- old glass jar (thin and high)
- straw ribbon with flower wire (when you get a bouquet and it's time to dry it up or throw it away, don't forget to scavenge all the good parts like ribbons and flower wire)

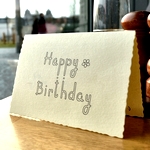
Hand-drawn Happy Birthday Card {free printable} + Corel Draw Tutorial
Monday, 3 March 2014
Tags:
corel draw
,
diy
,
free
,
gift
,
happy birthday
,
printable
You can print out one (or more :) yourself, and even color it, if you wish to make ti more lively.

Materials
- printer
- A5 paper (best is a thick paper that holds shape when folded in the middle)
- Happy Birthday Card free pdf printable
Printing Tip
When printing the Birthday card, make sure your printer scaling is set to "None" and not to "Fit to printer margins". This way the text will be nicely centered.

Five Minutes Valentine's Gift - Fuzzy Hama Heart
So Valentine's Day is coming.. To be completely honest, I am not a huge fan, but some subtle decorations are really OK ;) And this year, it took me only a couple of minutes, a really fun and easy DIY project.

Materials:

4 simple steps

Materials:
- Hama beads
- Fuzzy wire
- Scissors
Materials Note: I got my Hama beads at IKEA. I saw them while walking through the kids section, with no project in mind I grabbed one box since it was so cheap and I just though they might come in handy sometimes :) As for the fuzzy wire, you can get it at your local craft store or online, just Google it. I used a 50cm / 20" wire for the big heart and a 25cm / 10" one for the small heart. Just a small hint: the larger the heart, the weaker is its structure.
4 simple steps
- Take your fuzzy wire and fold it in the middle, pressing it hard to create the pointy bottom of the heart.
- Pull the hama beads on each half of the wire, leaving a small gap between them. (The fuzzy wire will stop them from shifting around too much)
- Leave the last 1.5 cm / 0.5" of the wire without beads
- Now open the wire to create a blunt V-shape. Take the ends and curve them inward to create a heart shape. Twist the ends together tightly to hold the heart shape in place.
You can place them almost anywhere you want, I decided to put mine on our pin board :)
Simple Happy Birthday Garland {free printable}
Actually, I did this project exactly one year ago. I was at my parents house because it was my fathers birthday. Everybody was out, and Elise (then only 9 months old) was sleeping so I decided to decorate the dinning room as a surprise. I figured that a printable garland would be quick and easy, so I started browsing the internet. Unfortunately, I didn't find a garland that was conservative enough (to fit the style of my parents house), so I had to design my own. Since I didn't have my laptop with me, I used the house PC and did a quick job using only Photofiltre (free image retouching program). It wasn't completely perfect, but it still turned out quite nicely :)

So a year later, I stumbled upon this picture in my phone, and decided to upgrade the design for a free printable for everyone :)
Note: The approximate length of the garland, from H to Y (including a gap between the words but without decorative pieces) is 1.8 meters (70 inches)
Happy Birthday Garland Free Printable

So a year later, I stumbled upon this picture in my phone, and decided to upgrade the design for a free printable for everyone :)
Note: The approximate length of the garland, from H to Y (including a gap between the words but without decorative pieces) is 1.8 meters (70 inches)
Happy Birthday Garland Free Printable
Swimming noodle pony
So, after a week of not doing any crafts, because I had to study for my exams, I was in the mood to make one quick little DIY project. I stumbled upon this great idea to make swimming noodle ponies. It took me only about 30 minutes and here is the result. I followed the tutorial from this blog adding couple of my own tweaks.

DIY Quick & Easy Christmas name tags
Hello :)
so if you don't have time (just like myself) to create some fancy name tags for presents, yet you don't want to buy them (because if they are self-made, they add this special personal touch to your presents) here is a way to have them done in no-time. (Note: the photos were taken with my phone, so their quality is literally non-existent :)
All you are going to need is:
- sheets of felt paper in several colors (or any felt sheets)
- sharpie or any thin marker in dark color
- scisors
- a scrap of paper you find lying around the house (only if you wont need it anymore :)

How to make the name tags:
- Simply write the names on the felt paper. Leave enough room between them. A tip: write slowly, the felt paper needs to absorb the color from the marker

- Then cut them out and make a little pointy arrow at the end (see picture)
- You can make a hole in the arrow with a punch maked but mine got stuck all the time so I simply cut them out with my scicors
- FINISHED!! You have your nice name tags :)

You might also like..

Subscribe to:
Posts
(
Atom
)