You can print out one (or more :) yourself, and even color it, if you wish to make ti more lively.
Materials
- printer
- A5 paper (best is a thick paper that holds shape when folded in the middle)
- Happy Birthday Card free pdf printable
Printing Tip
When printing the Birthday card, make sure your printer scaling is set to "None" and not to "Fit to printer margins". This way the text will be nicely centered.
For the curious ones, who would maybe want to draw & design their own birthday cards (or invitations etc.), here is the technique how I make mine, so inspire yourself :)
1. First I draw the desired text with my hand, preferably using a thin black marker. Sometimes there are many trials and errors, and sometimes I just grab a piece of paper and my black Indian ink pen and draw it in one go.
3. Create a new file in Corel Draw and import the scanned picture.
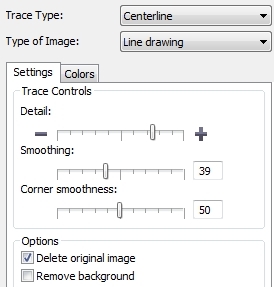
4. Now use the functions "Trace Bitmap". Select the option "Centerline Trace" and then "Line drawing"
 5. Adjust "Detail", "Smoothing" and "Corner Smoothness" so that you are satisfied with the results. It really varies from picture to picture, from the quality of the scan, from the thickness of your pen/marker etc. So just take your time, and adjust the options in minute steps. This part is really important and saves you a lot of work in the next step. Sometimes a change of "1" will make a huge difference.
6. Leave the option "Delete original image" checked and click OK.
7. Ungroup the drawing: select the whole object by clicking Ctrl+A, then right click on the object and select the option "Ungroup All". This will separate your drawing into individual curves what you can edit easily.
8. Now comes the fun part :) Using the Shape tool (select it from the toolbar or activate it by pressing F10) select individual letters and smooth out the edges. For you first project I recommend using only the first two buttons to add and delete nodes. Adding nodes will increase the number of editable line segments, and by deleting nodes you will smooth out the curve. You can then move the nodes to increase the curves or change the directions of the lines.
9. When you compare my hand drawing and the final product you can see that apart from smoothing out the edges, I made quite a few changes. I made the H wider, I elongated T and H and used my Y twice. For all those changes I used the Shape tool and the Knife tool (grouped under the Crop Button). Since each drawing is different, I suggest you start with minor changes and slowly work you way to the more complex ones. It's really easier than it maybe looks :)
10. Use Guidelines and "Snap to guidelines" option to align the letters and adjust their spacing.
11. Printig finish: If you want to print out an A5 birthday card and fold it in the middle as me, set the page size to A5, portrait orientation and center your drawing the bottom half (again, guidelines help a lot). Export to PDF and print it out anywhere you want :)
Voilà, your own personal hand-drawn happy birthday card is done and ready to make a special person smile :)
You might also like
Simple Happy Birthday Garland {free printable}
(blog post)


This is a really nice and simple birthday card :) I already have a person in mind, who I want to give it to. Thank for the free pdf printable :)
ReplyDelete